View Roster By Agent
The View Roster by Agent feature will allow a WFO Live user to view and edit the shifts a single agent is assigned to for multiple days at once. Most of the standard roster features are present, including un-assigning agents, adding mid-day exceptions, and the auto-assign functionality. There is also swap functionality that allows users to swap a shift that the agent is assigned to with another of their assigned shifts on a different date.
Assignment Grid
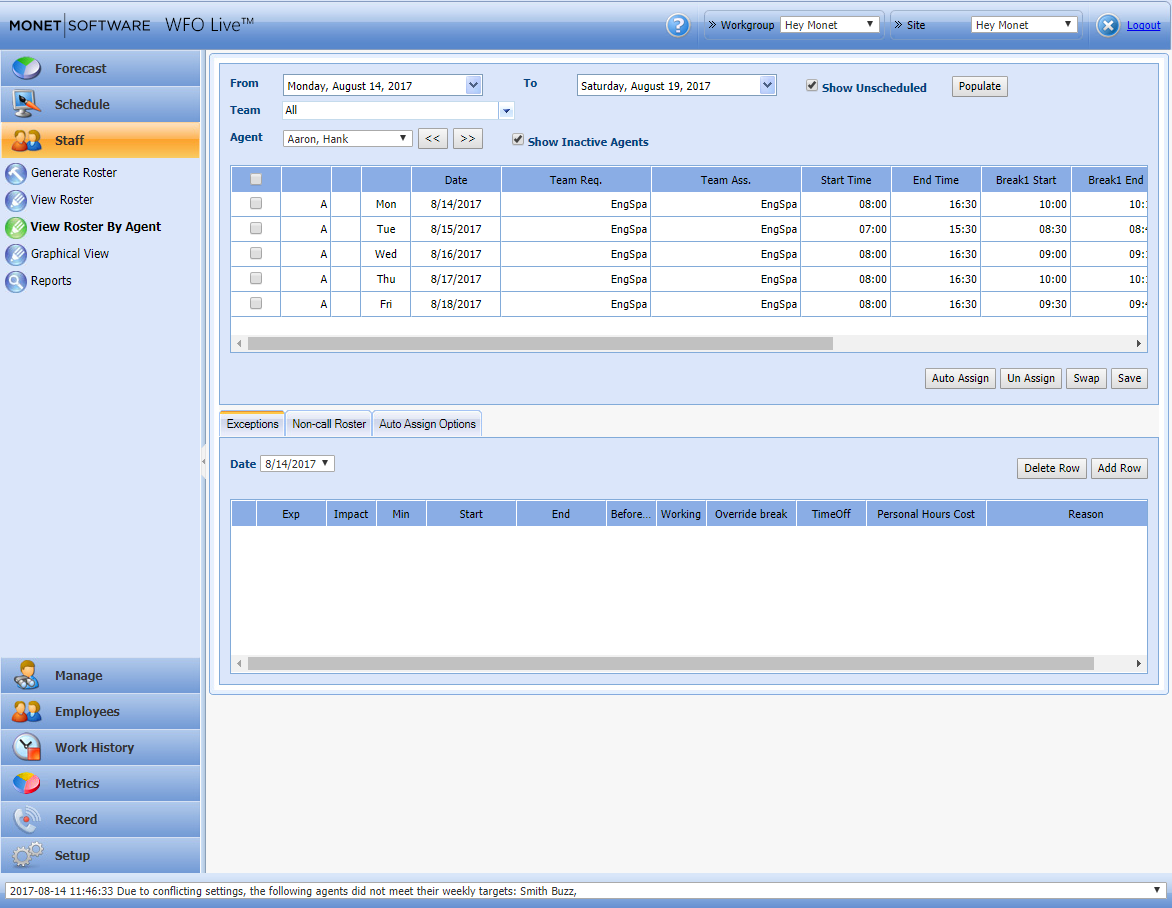
When accessing the Staff module, there is an option for View Roster by Agent. When this link is selected, a page will open; and the default settings will display a grid of the shifts for the first agent in the Employee List (alphabetically sorted).
It will show one week’s worth of rosters for this agent starting from the closest roster to the current date with all the normal details of those shifts (including Skill Team assignment, Start and End times, Break times, Lunch times and Agent Cost). These fields are all editable. Double-click the desired field, make the modification, and click Save to edit any shift.
The Date Range selection boxes allow the selection of a range of days, up to a 30-day span. Once the desired range has been selected, click the Populate button to populate the roster grid with the dates selected. Any day the agent has been assigned will show up as an editable shift, with the date of the shift listed in the Date column.
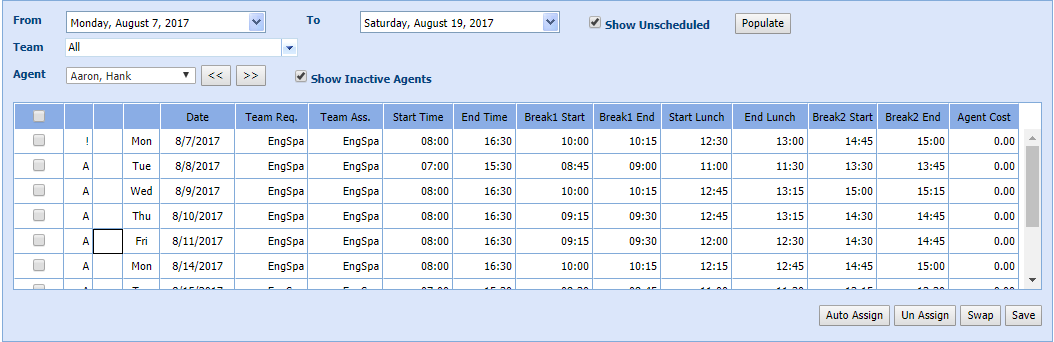
Unassigned days will be denoted by UNA for unassigned, and will contain no skill team or shift information. If showing the unassigned days is not desirable, un-check the Show Unscheduled check box before populating the grid.
The Agent filter will allow the selection of any agent in the Employee List; and if the Show Inactive Agents check box is checked, this list will also include inactive agents that have been assigned previously, but are not currently active.
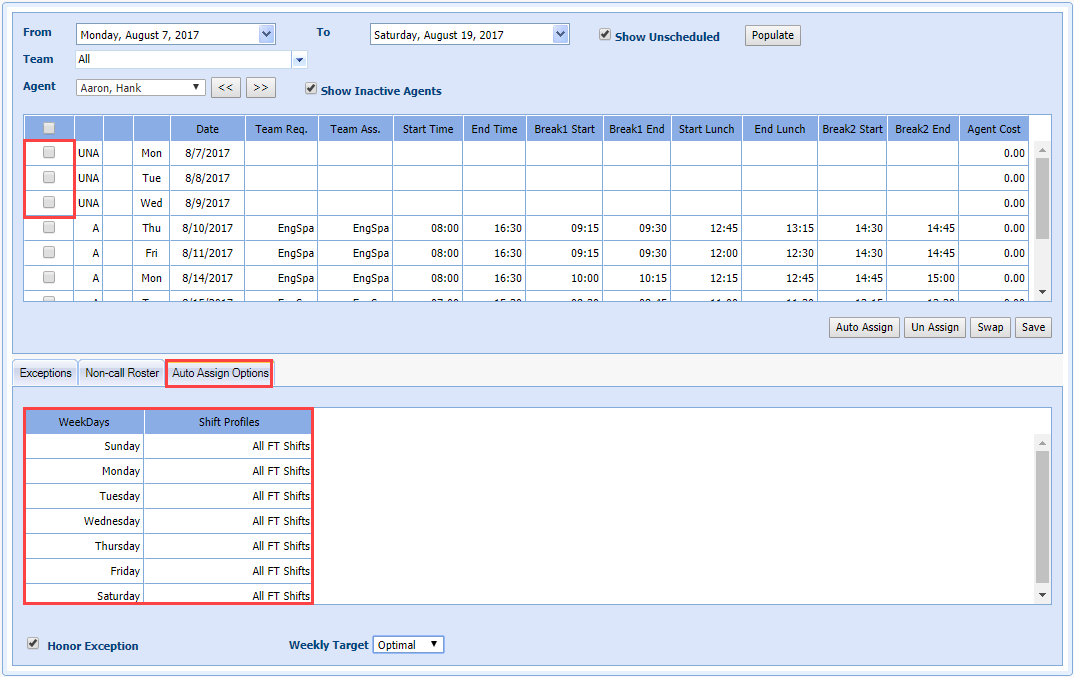
A skill team filter is available to filter down to only agents that are assigned to a particular skill team. The main difference here is that the check box on the far left column of the grid will allow the user to select multiple days to edit at once. This is used by the Un-Assign functionality to allow the user to select multiple days, and un-assign them all at once. This will also work with the Auto-Assign.
Roster Assignment Designations
The Roster Assignment Designations are:
| Designation | Description |
|---|---|
| ! | Agent assigned to the roster manually |
| $ | Shift appended to the roster manually |
| (blank) | Agent assigned to the roster via the regular roster assignment process (requires use of scheduling module) |
| * | Shift copied to the roster manually |
| @ | Shift added through the Anywhere Options |
| A | Agent assigned to the roster via the auto assign routine |
| F | Agent assigned to the roster via a fixed shift (requires use of scheduling module) |
| I | Agent assigned to the roster via a fixed shift generated by the auto assign routine (schedule cannot present when roster is generated) |
| S | Agent assigned to the roster via a fixed shift without a skill team |
| X | Shift swap from MA |
| U | Shift was unassigned from an Agent |
| UNA | Agent is not assigned for the date |
Auto Assign
The Auto Assign feature operates the same as it does on the View Roster screen, except for one key piece of functionality: the auto assign process can be applied to multiple days at once (independently from the roster generation process) for one agent at a time. This allows agents to get a week’s worth of shifts auto-assigned after a roster for the same period has already been generated, without affecting the schedules of the other agents.
The Shift profile that is selected on the Auto Assign Options tab will be the shift profile that is used to assign the agent, even if they have a different profile selected for any given day on their individual profile. Place a check in the unassigned rows, select the desired shift profiles, and click Auto Assign.
Two other fields are available:
| Designation | Description |
|---|---|
| Honor Exception | When unchecked, Monet will ignore previously entered expectations and create a schedule for all agents, even those who may have existing time off. |
| Weekly Target |
Weekly Target refers to the Weekly and Monthly min / max hours on the employee profile.
|
Exceptions/Non-Call
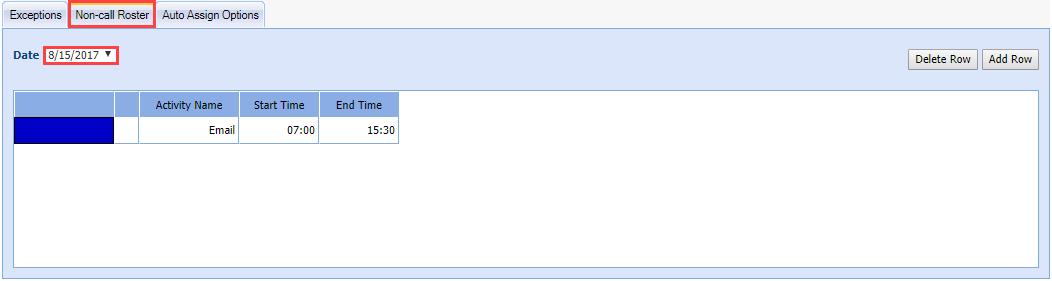
The Exceptions and Non-call Roster tabs function as they will on the View Roster screen, except that a date must be selected in the drop-down Date menu to place the exception/non-call activity.
The exception or non-call activity that is entered will go onto the date displayed in the drop-down box when saved. All of the normal functionality for moving breaks and lunch according to the configuration settings of the exception will apply. Only Mid-day exceptions can be seen on this screen.
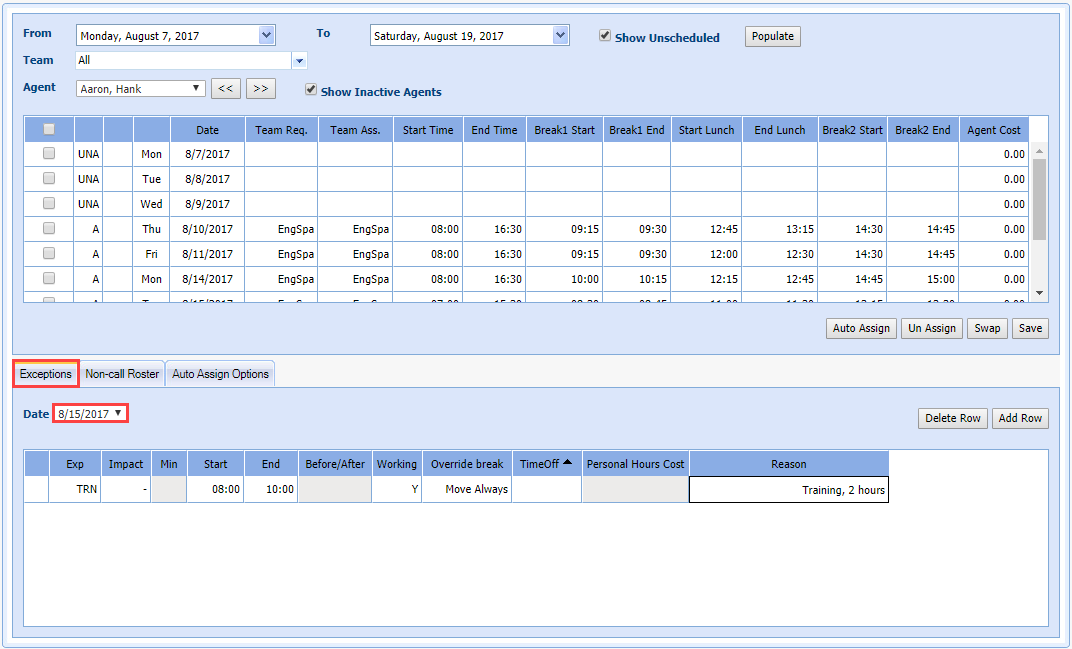
Non-call Roster functions the same way; rows are added manually and saved to the date selected in the drop-down. The date is the one the exception entered will fall on when the roster is saved.
Exception Conflict Resolution
When an exception conflicts with another scheduled activity, the existing activity can be overridden, moved, truncated, or preserved. Preserve allows administrators to enter a full day's schedule of mid-day exceptions, and have Monet automatically create exceptions around the other existing activities like Breaks, lunch, non-call, and other exceptions.
Before the Roster is Generated
Preserve becomes an option before the schedule is generated if:
- The user inputs a new mid-day exception that conflicts with an existing mid-day exception.
- The new exception must conflict and be greater than either the start or end time of the existing exception, or both.
After the Roster is Generated
Preserve becomes available if there are any conflicts with existing activities other than "Available" time:
- Breaks
- Lunch
- Non-call
- Mid-day negative or neutral exceptions
Overlap
The new exception only occupies the space before or after the existing exception. If there is a Full-Overlap that Exceeds Both Start and End Times of an Existing Exception, two new exceptions are created to fill in the space around the existing exception; and the existing exception is left intact.
Personal Hours and Time Off Hours Handling
If the new exception contains Personal Hours or Time Off hours, the value for the exception being entered is split proportionally across the new exceptions being created.
Break and Lunch
- Move/Move Always/Override break and lunch handling is taken from the exception as it is created.
- The conflict resolution dialogue is only shown when a break or lunch will be overridden, regardless of the Move/Move Always/Override user selection. When this dialog is received, Preserve is an option. If the break or lunch can be moved with the Move/Move Always selection, the dialogue is not shown.
- The dialog is always brought up if Override is selected, and an existing activity will be deleted.
- The Preserve option will always display except in one case:
- The exception does not exceed either the start nor the end of the existing activity (multiple if the existing activities are adjacent).
- If neither the start nor end time of the new exception goes beyond the start or end time of the existing activities, then the Preserve option is not displayed.
- When the user selects Override, the conflict dialogue is brought up. The user selects Preserve, then the breaks and lunch are kept in place.
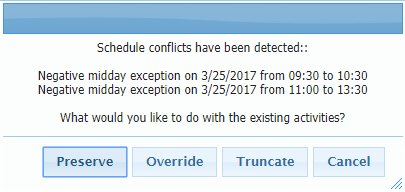
- If an exception conflicts with other scheduled activities, the exception
entry conflict dialog displays showing where conflicts were detected.
Choose to Preserve the existing
activities, Override, Truncate,
or Cancel the exception addition.
Shift Swapping
The View Roster by Agent screen supports a swapping feature that is different from the swapping functionality on the View Roster screen. In this screen, the user can select two shifts that an agent has been assigned for a given range by placing a check in the box next to the desired shifts, clicking Swap, and clicking Save to swap the shifts with one another.
